|
 The rear bumper and Hy-Rail wheels can now be fabricated using a paperclip and styrene tubing for the front hydraulic cylinders. A scrap piece from the original dump trailer will be used to fabricate the truck rear bumper. The rear bumper and Hy-Rail wheels can now be fabricated using a paperclip and styrene tubing for the front hydraulic cylinders. A scrap piece from the original dump trailer will be used to fabricate the truck rear bumper.
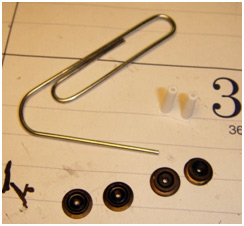
This picture shows the initial ingredients that make up the front hydraulic Hy-Rail gear. A large smooth paperclip, four N-gauge train wheels and two pieces of styrene tubing are needed to get going. The pieces of tubing are shown glued to a piece of styrene sheet. The sheet will be trimmed to the outside diameter of the tubing forming the top of the hydraulic cylinder.
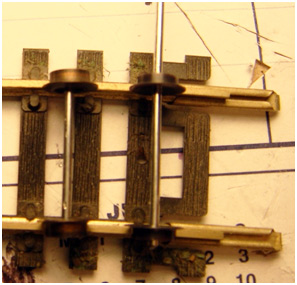 Gauging (setting the distance between the wheel treads to fit between the railroad rails) the wheels is important before getting too far. The wheel set axle on the left has already been trimmed to length as this will become the front Hy-Rail axle, the one on the right (rear Hy-Rail assembly) is lined up and ready to be bent into shape with pliers. A file is used to flatten the end of the paperclip so it does not protrude beyond the exterior of the wheel rim. A small drop of CA glue is used to secure the wheels to the paperclip axle. Place the glue on the inside of the wheel at the axle. Gauging (setting the distance between the wheel treads to fit between the railroad rails) the wheels is important before getting too far. The wheel set axle on the left has already been trimmed to length as this will become the front Hy-Rail axle, the one on the right (rear Hy-Rail assembly) is lined up and ready to be bent into shape with pliers. A file is used to flatten the end of the paperclip so it does not protrude beyond the exterior of the wheel rim. A small drop of CA glue is used to secure the wheels to the paperclip axle. Place the glue on the inside of the wheel at the axle.
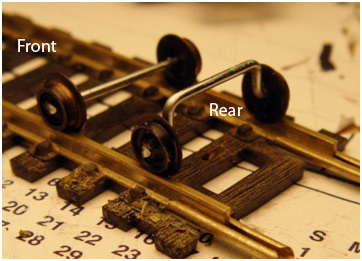
This picture (left) shows the front and rear Hy-Rail axles fabricated. The left one is to be mounted on the front and the right (rear) one is bent to accommodate the swing needed around the tip of the vehicle frame. This will prevent the wheels from hitting the ground when in the down position.
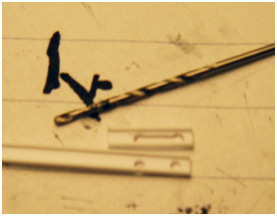 This picture shows the rear Hy-Rail mounts taking shape. The next step will be to drill a set of holes within a piece of .080" styrene channel. The hole should be the diameter of the paperclip. Connect the two holes with a slot slightly narrower than the diameter of the two holes (dog bone shape; refer to photo at right). The dog bone allows the axle to snap into either hole and stay put when in either the up or down position. This picture shows the rear Hy-Rail mounts taking shape. The next step will be to drill a set of holes within a piece of .080" styrene channel. The hole should be the diameter of the paperclip. Connect the two holes with a slot slightly narrower than the diameter of the two holes (dog bone shape; refer to photo at right). The dog bone allows the axle to snap into either hole and stay put when in either the up or down position.
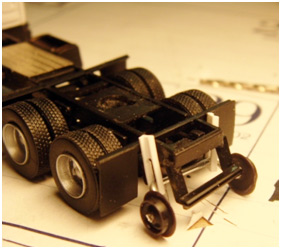
This picture shows the rear lift axle assembled and sitting against the chassis unglued. Once painted and glued perpendicular to the sides of the frame rails the axle will snap up and down within the dog bone and the styrene channel. By using a piece of channel, the sides add strength as well as helping to lock the axle in a vertical position.
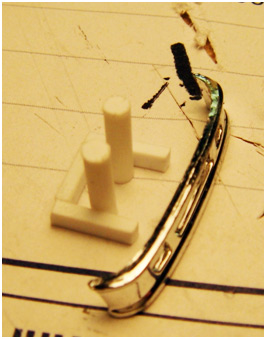 This is the front Hy-Rail wheel hydraulic cylinders being fabricated. This picture shows the styrene tube capped with .010" styrene sheet. The frame extension is made of .060" x .080" styrene strip. The bumper comes with chrome finish that will be repainted to the more prototypical dull gray finish. The tubes are precisely spaced apart to allow a U-shaped paperclip to raise and lower within them. Additional reinforcement braces will be needed as much of the model weight will be resting on these points when in the on-rail position. This is the front Hy-Rail wheel hydraulic cylinders being fabricated. This picture shows the styrene tube capped with .010" styrene sheet. The frame extension is made of .060" x .080" styrene strip. The bumper comes with chrome finish that will be repainted to the more prototypical dull gray finish. The tubes are precisely spaced apart to allow a U-shaped paperclip to raise and lower within them. Additional reinforcement braces will be needed as much of the model weight will be resting on these points when in the on-rail position.
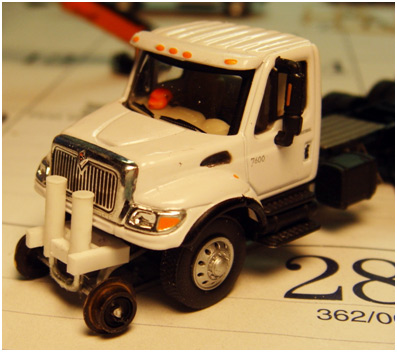
This picture shows the front Hy-Rail bumper extension resting against the front of the chassis. There are a series of paperclips used to make up the axle, supports, and rams that go into the 3/32” styrene tubing. This picture also shows the additional supports in front of the cylinders. Now it's off to the paint booth!
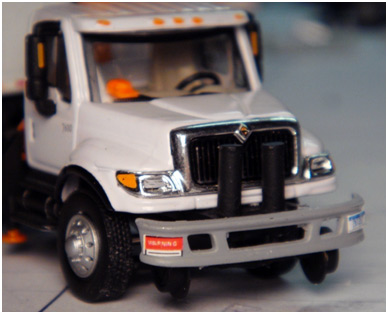 Here we are closer to the final product. Once painted, the Hy-Rail frame extension can be CA glued to the original chassis. Roughing up the original plastic with a file will make the glue bond stronger. A good tight, clean fit is necessary to maintain strength. I have also added a license plate and one of the many warning stickers you see on fleet vehicles. Here we are closer to the final product. Once painted, the Hy-Rail frame extension can be CA glued to the original chassis. Roughing up the original plastic with a file will make the glue bond stronger. A good tight, clean fit is necessary to maintain strength. I have also added a license plate and one of the many warning stickers you see on fleet vehicles.
Continued on page 5
Quick Link To Page # - 1 2 3 4 5 |

 The rear bumper and Hy-Rail wheels can now be fabricated using a paperclip and styrene tubing for the front hydraulic cylinders. A scrap piece from the original dump trailer will be used to fabricate the truck rear bumper.
 Gauging (setting the distance between the wheel treads to fit between the railroad rails) the wheels is important before getting too far. The wheel set axle on the left has already been trimmed to length as this will become the front Hy-Rail axle, the one on the right (rear Hy-Rail assembly) is lined up and ready to be bent into shape with pliers. A file is used to flatten the end of the paperclip so it does not protrude beyond the exterior of the wheel rim. A small drop of CA glue is used to secure the wheels to the paperclip axle. Place the glue on the inside of the wheel at the axle.
 This picture shows the rear Hy-Rail mounts taking shape. The next step will be to drill a set of holes within a piece of .080" styrene channel. The hole should be the diameter of the paperclip. Connect the two holes with a slot slightly narrower than the diameter of the two holes (dog bone shape; refer to photo at right). The dog bone allows the axle to snap into either hole and stay put when in either the up or down position.
 This is the front Hy-Rail wheel hydraulic cylinders being fabricated. This picture shows the styrene tube capped with .010" styrene sheet. The frame extension is made of .060" x .080" styrene strip. The bumper comes with chrome finish that will be repainted to the more prototypical dull gray finish. The tubes are precisely spaced apart to allow a U-shaped paperclip to raise and lower within them. Additional reinforcement braces will be needed as much of the model weight will be resting on these points when in the on-rail position.
 Here we are closer to the final product. Once painted, the Hy-Rail frame extension can be CA glued to the original chassis. Roughing up the original plastic with a file will make the glue bond stronger. A good tight, clean fit is necessary to maintain strength. I have also added a license plate and one of the many warning stickers you see on fleet vehicles.